| Search results - "4.4" |

2 views
|
|

27 views
|
|
63 views
|
|
26 views
|
|
23 views
|
|
23 views
|
|

23 views
|
|

25 views
|
|

60 views
|
|

Heater Illumination33 views
|
|
17 views
|
|
32 views
|
|

28 views
|
|
30 views
|
|

28 views
|
|
24 views
|
|

22 views
|
|

14 views
|
|

15 views
|
|

21 views
|
|

13 views
|
|

28 views
|
|

142 views
|
|
127 views
|
|
7 views
|
|
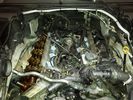
4.4 L Petrol Engine210 viewsIntake removed on V8 4.4L Petrol Engine to remove hose with T in it.
plse like my facebook page https://www.facebook.com/DifferentialPartsUS
|
|
0 views
|
|

Engine Accessory Drive Description and Operation872 viewsThis 2 page pdf shows both belts for the 4.4L petrol V8; the primary serpentine belt, (the long one), and the shorter secondary that drives only the radiator cooling fan.
The various accessory pulleys the two belts are each associated with are numbered and an included table describes each.
When replacing belts and pulleys, count the number of grooves on both your old items and your new replacement parts. It has been known for an pulley with the wrong number of grooves to come with a replacement part or the replacement belt has the incorrect number of grooves; hence make certain the groove count on the new parts are the same as the removed items.
|
|

24 views
|
|

32 views
|
|

Air Conditioner Specifications 4.4L V81539 viewsThis 2 page pdf is just the specifications for the AC system. The refrigerant type is R134A.
Note that when topping the system up, it can be a good idea to include some of that ultra violet light dye that will glow to show leaks and loose fitting.
|
|

Cooling system hoses - 4.4L petrol V81098 viewsThese are the cooling system hoses on the 4.4L petrol V8. The little odd shaped bleeder hose, (LR006158), shown in the top right hand corner can give problems. There is a plastic tee with a threaded air bleeder outlet located in the middle of the hose. The plastic tee can or will fail due to I guess heat distress.
A BIC pen can serve as a field fix, however for your parts kit, a nominal 3/8" ID hose size brass hose barb inline connector plus a couple of hose clamps is suggested. Better yet is a threaded hose barb brass coupling or a tee and bleeder valve to allow bleeding of the line. Land Rover now makes the plastic bleeder valve that breaks available as a separate part, # LR027661, where 0 is a zero. As such, one can now purchase that part only for addition to your field fix parts kit.
|
|

Cooling System - Description and Operation 4.0L and 4.4L petrol engines 5 pages1009 viewsThis is a 5 page pdf that provides some insight into how the coolant flows thru all the hoses. Of interest is the paragraph,(page 3/5), that attempts to explain how and why the thermostat is designed to open at different engine operating temperatures - in brief, the reason for the spaghetti tangle of small hoses on the top of the engine.
There is also reference to an engine oil cooler that I gather cools something I think related to a supercharger, if fitted.
|
|

4.4 V8 Engine2573 views
|
|

LR3 4.4 V8128 viewsDSC02863.JPG
|
|

LR3 4.4 V8124 viewsDSC02865.JPG
|
|

4.4 V8 Description101 views
|
|

Fluid, Filter/Pan Combo removal and install5948 viewsThese are the LR instructions re removal and install of the plastic pan/filter combo for the ZF 6HP26X transmission on the 4.4L petrol V8 LR3.
The instructions tend to ignore the reason you have to lift the right hand side of the engine about 40 mm. This is because of a frame cross member that interferes with dropping down of the plastic pan. The real problem is a vertical "oil filter spout" that rises out of the filter/pan combo up into the transmission. The spout is the suction pipe for filtered transmission oil back up into the tranny.
On the metal pan versions, the filter is separate from the pan, hence the filter remains with the tranny when the metal pan is dropped. The filter is then removed or installed independent of the metal pan, hence with the metal pan, there is no need to lift the engine.
If one is removing the plastic pan so as to install the metal pan, then some do not lift the engine but just drop the plastic pan enough to gain access to saw off the vertical plastic spout - it is a one time procedure.
Be aware however that the metal pan uses a flat gasket and the plastic pan uses a O ring like perimeter gasket that sits in a half round groove in the tranny casing. Also the metal pan uses 21 shorter torx M6x22.5 metric cap screws for the perimeter bolts. The plastic pan uses longer M6x28.5 torx metric cap screws.
|
|

Dirty V886 views4.4 V8 and my very vaguely Christmassy cottage in background!
|
|

Dirty V879 views4.4 V8 and my very vaguely Christmassy cottage in background!
|
|

Dirty V882 views4.4 V8 and my very vaguely Christmassy cottage in background!
|
|

2005 HSE 4.4251 views
|
|

Amari 4.4 V8 (Spain)122 viewsAt the villa in Spain
|
|
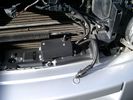
Battery Maintainer switch box and connector 716 viewsThe Hammond box contains a DPDT toggle switch with centre off. The Positive and Negative from each battery feeds to the switch. Depending on the setting of the toggle, (full left, full right,or centre off),the respective batteries connect into the pigtail that can stick out thru the grill when one wishes to connect the charger.
This allows one to charge each battery independently via a suitable battery maintainer. I use a CTEK unit that feeds a maximum of 3.3 amps at 14.4 or 14.7 VDC, depending upon setting. The wiring therefore allows for a slow recharge of either of the batteries separately if either one requires such.
|
|

Excel file for Rotors and Brake Pads part numbers for 4.4L V8 petrol LR3765 viewsComparing the cost of the various brands of brake parts is time consuming. Once you have your parts costs, this little spreadsheet will make collating the info easier.
I did not make any provision for labour costs, but the file can be downloaded and then modified. You can change Dollars to Euros or Pounds or whatever and insert lines for labour costs as desired.
Do not pay too much attention to the $ numbers as they are a mix of US and CDN, and from differing time frames, (prior to Spring 2011) . Also the brake part numbers are for my 2005 North America spec LR3 with the petrol 4.4L V8; diesel powered and supercharged 3's may have different part numbers
|
|

LTB00125 - Technical Bulletin - 4.4L V8 Short Engine Availability59 views
|
|
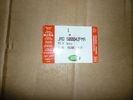
Step 1455 viewsJAG500042PMA body hardware, cowl, cowl grille 1 $64.40
|
|

SSM47477 - 4.4 Naturally Aspirated AJV8 Petrol Oil Filter/Housing Leaks 88 views
|
|
|
|